Dean M. Chriss
Photography
Basic Color Management for Digital Photography
Woody Pond, Georgia
Understanding the Problem
Every physical device deals with color in its own unique way. Film scanners may use either a LED (Light Emitting Diode) or fluorescent light source for capturing the film image on a CCD (Charge Coupled Device). Some digital cameras use CCD based technology too, but several very different designs are used by the various manufacturers. Each monitor manufacturer uses its own electronic circuit design. Inkjet printers made by various manufacturers use different technologies to spew ink formulated by various other manufactures onto paper made by still other manufacturers to produce color prints. Without any set standard, it is obvious that any given color will not look the same on all of these devices. Fortunately, there is a solution known as color management, where calibration or profiling of each device to a known standard gives consistent and accurate results.Color Spaces
A color space simply defines a range of possible colors. Colors possible in one color space may not be possible in another, and all are more limited than the range of colors that exist in the real world. Your digital camera, film scanner, monitor, and printer all operate within their own unique and non-standard color spaces. Some devices never expose their unique color space to the outside world, and instead translate it into one of several standard color spaces internally, before you ever see the data. The first step in managing color on an imaging system is to decide on a system-wide “standard” color space within which all images will be viewed and adjusted. This is often called the "working color space". There are a number of standard color spaces that are used for various reasons. The most common standard color spaces for photographic imaging are sRGB and Adobe 1998. The sRGB color space is the standard for Internet use because it most closely represents the way un-calibrated color monitors reproduce color. sRGB is frequently used for color printing too, but it is one of the more limited spaces. Adobe 1998 is a larger color space that enables a wider range of tonalities and is therefore better for critical printed work. It is important to remember that images meant for one color space will look terrible when viewed in a different one. For instance, if you put your Adobe 1998 images on a web page without converting them to sRGB, they will look dull and muted. Pro Photo is a color space that is so large it contains colors that the human eye cannot see.Device Color Profiles
Any color can be represented within its color space by a set of three numbers that define its red, blue, and green components. It is the job of device color profiles to translate or map each color in the device’s color space to a color in the “standard” color space. Once a color is translated into a standard color space it will look the same on every device that has an accurate mapping (color profile) between its own color space and the standard one. These profiles are the key to getting accurate color from your system. Device color profiles can be created, bought, or supplied free by equipment manufacturers. For a totally color managed system, digital cameras, scanners, monitors, and each printer, paper, and ink combination need a profile. Since you look at a monitor to decide on color adjustments, and you then want those adjustments accurately reflected in your prints, the most important profiles are for your monitor and printer.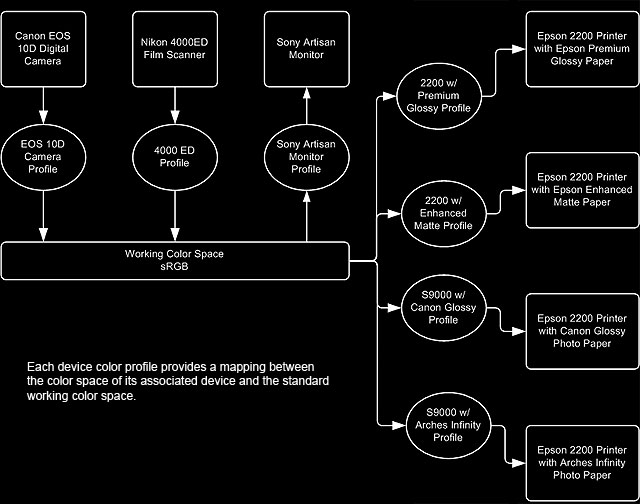
Monitor Profiles
The most accurate way to profile your monitor is to purchase a commercially available monitor calibration package. These use software together with a hardware device to measure the colors produced by your monitor and automatically produce a very accurate color profile for it. These are available from several manufacturers. Just follow the provided instructions. These calibration solutions are worth every penny they cost, and you won't be sorry you bought one.Printer Profiles
There are a few different approaches you can follow to get accurate color from a printer. They are:1. Buy a hardware and software package that creates a profile for any printer, paper, and ink combination you choose. These cost between a few hundred to thousands of dollars. It may be worth getting one of these if you experiment with many different paper and ink combinations, each of which requires a profile, or if your printer manufacturer has no color profiles available for your printer model.
2. Buy a profile for your printer, paper, and ink combination from a third party supplier. You can easily find suppliers on the Internet. These are not particularly cheap, but if you only need a few this can be a cost effective way to obtain custom printer/paper profiles.
3. If your printer manufacturer supplies profiles for their own brand of printer, ink, and paper, you can simply use these and stick with the paper and ink recommended by the manufacturer. Some Epson printers are supplied with excellent color profiles that are hard to beat under any circumstance.
4. Many paper manufacturers supply free profiles for using their paper on various popular printers. The quality of these can vary widely, but in recent years profiles from the better known paper manufacturers are excellent.
5. Use controls in the printer driver to adjust the printer to print what you see on the calibrated monitor. From then on, use those settings when you print using the same paper and ink. This method is the least accurate and it is more easily described than done.
Manufacturer’s Generic Profiles and Other Devices
Many digital cameras and scanners are calibrated for sRGB or have selectable color space profiles that include sRGB and Adobe 1998. These settings invoke generic manufacturer supplied profiles that translate the camera’s color characteristics to the appropriate color space. Sometimes individual cameras, scanners, and printers can vary significantly from the average for a given model. Manufacturer supplied generic profiles for all of these devices may or may not be adequate. It all depends on how close your individual device is to “normal” and how critical you are. If your monitor and printer are accurately calibrated you will always see what you’ll get before printing, so minor inaccuracies in camera and scanner profiles may be acceptable. More accurate results from digital cameras can be obtained by using profile aware RAW file conversion programs like Capture One and Adobe Camera Raw.Only the Basics
This article has presented only the most basic concepts of color management. Although a lot more can be learned about this topic, a good implementation of these basic concepts is enough to begin making excellent prints. Obtaining accurate equipment profiles and using them properly will save plenty of ink, paper, and frustration.Please note that this is an essay is very old. In November of 2013 it was purged of information that had become useless or irrelevant. What remains are concepts that have not changed. It can therefore still be of use to those wanting to better understand the principals of color management. There is also an old essay here that might help get your monitor settings in the right ballpark without any calibration hardware.
Happy imaging!
Dean